Intro
I’ve recently moved my blog from Ghost to Hugo. Previously, I was using the hosted version of Ghost, where they manage everything for you and collect a tidy sum for the trouble.
You can read more about the reasons for my switch here. Now I’m self hosting this blog on a laptop in my house, I’m more concerned about bandwidth and traffic. I don’t have the fastest internet connection in the world (I’m not yet on Fibre). I get 125Mbs down and 25Mbs up. This is more than enough to self-host a modest blog like mine, which receives just under 10k views a month, but I’m a stickler for efficiency and performance these days. HTML, JS and CSS are very lightweight (they’re just text), Images make up the bulk of the traffic, so are the best candidates for optimisation.
Before the move to Hugo, every image added to a blog post via Ghost, was just a jpeg/png I’d uploaded without thought of size/dimensions/optimisation. As everything was being hosted for me and the Lighthouse Performance scores looked reasonably good, I didn’t touch it.
If it aint broke, don’t fix it.
Now I’m self-hosting, every……..byte……..matters. More bytes sent = less CPU for other tasks my server is doing and less bandwidth I have available for internet usage in my home.
Why? What’s wrong with jpeg/png?
There’s nothing wrong with jpeg/png, however a more efficient format called webp is available.
JPEG
- Released 1992
- Lossy format
- Designed for photographic images
- Does not support transparency
PNG
- Released 1996
- Better than JPEG for images which contain text/lines/graphics (and large areas of solid colour)
- Lossless
- Supports transparency
Both JPEG and PNG have their uses, however, the web and technology has moved on. Mobile devices (with lower CPU/Memory/Network bandiwth) became ubiquitous over the past few decades, which created a need for smaller image sizes with no visible loss in quality.
WebP
- Released 2010
- Developed by Google
- Smaller filesizes than JPEG with no discernible difference in image quality
- Supports both lossy & lossless modes
WebP has been supported by most major browsers since 2020, so it’s still relatively new. According to W3Techs WebP is used by ~7% of all websites, and it’s use is continuing to grow.
An Example
Let’s take the hero image (at the top of the page) of this post as an example. The original jpeg version of that image is 2.1mb, with dimensions 4608 x 3456.
By converting that image to webp with lossy compression, using a compression factor of 75 (100 being best quality), the image size drops down to 0.9mb.
The webp version is less than half the original image size (42%) with an output that has no obvious drop in quality.
Assuming for a moment, that there’s no CDN fronting my blog and I have 10 posts, each with a hero image which is 2mb, and each post gets viewed 100 times a day. The total traffic out of my server would be 2,000 MB (2 GB) per day.
Now, if I do the simple switch to webp, I’m only serving 900 MB per day.
(I am actually using a CDN, which takes more traffic away from my server (the origin), and will talk a bit more about that later in the post)
How
It’s really easy to convert jpeg/pngs to webp. It will depend on your operating system, but you can find the WebP utilities (made by Google) here.
I’ve been enjoying Linux (on metal and on Windows via WSL2) a lot recently, so I’m going to detail the steps for Debian (WSL2), on my Windows 10 machine. Here are the commands to install and convert an image to webp
sudo apt update

# Install webp tools
sudo apt install webp

# Download a landscape image from Unsplash (4.75mb)
wget -c "https://images.unsplash.com/photo-1503424886307-b090341d25d1?ixlib=rb-4.0.3&q=80&fm=jpg&acrop=entropy&cs=tinysrgb" -O landscape.jpg

# Show filesize (will show 4.7M)
du -h landscape.jpg

# Use the cwebp command to convert image to webp format using default (-q 75) setting, and output to a different file
cwebp landscape.jpg -o landscape.webp

# Show filesize of webp image (will show 2.7M) - which is less than half of the jpg!
du -h landscape.webp
Resizing too
Some of the images/examples above are over 4000 px wide, this is much larger than needed on my blog (and most sites). So we can resize these images when converting to webp too.
The cwebp command has a resize parameter, where you specify the width and height in pixels respectively. Specifying one as 0, will ensure that the image’s aspect ratio is preserved
# Convert image to webp format using default (-q 75) setting, and also resize to 2000px wide. Setting the height to 0 maintains the image's aspect ratio
cwebp landscape.jpg -o landscape-resized.webp -resize 2000 0

# Show filesize of resized webp image (will show 616K = 0.6M)
du -h landscape.webp
We’ve now lost a total of 4.1Mb from the image, by being clever with it’s format and size. It’s still a large image by web standards, 2000px is wide, so there is scope to further reduce this for even more savings.
Convert multiple images - A script
If you like the look of these savings and have a large collection of jpeg/pngs then a simple bash script can convert all of them over to webp, in one scoop. This is heavily inspired by the script I use to convert all images for my blog. I’ve commented it inline to explain what it’s doing.
#! /bin/bash

# The path to search
search_dir = "path/to/images"

# Search the directory above, and it's sub-directories, for any file which has the file extension: [.jpg, .jpeg, .png]
for f in $(find $search_dir -type f \( -iname \*.jpg -o -iname \*.jpeg -o -iname \*.png \))
do
  # Print the image filename
  echo "Got Image: $f"
  # Create a variable for the new filename (e.g. if jpeg = image1.jpeg, "NEW_FILE" will be image1.webp)
  NEW_FILE="${f%.*}.webp"
  # Convert the image, passing in the current image filename, and the output destination ($NEW_FILE)
  cwebp -q 75 $f -o $NEW_FILE
  # Delete the original image
  rm $f
done
Going further & Adding cloudflare into the mix
I’ve debated wether to include this section in this post as it’s not directly related to converting images to webp format. However a quick mention might be beneficial to some readers and I will be doing a more in-depth blog post about my Cloudflare setup in the future - which really makes the most of their free CDN tier and means I’m serving minimal data from my origin.
Cloudflare is a CDN, CDNs (among many other things) cache web content “at the edge” (a server physically located near to you), to improve website performance.
I’ve got CDN level caching of images turned on. I’m using nginx to serve my static blog pages, so I’ve configured the cache-control response header for any type of image, set at 365 days. Images on this blog, with the same filename, wont change, so this is a sensible value. As I’ve got Cloudflare fronting my blog, Cloudflare will also cache those images for 365 days. So, when an image has been served to a visitor of the blog once, which passes through the Cloudflare network, Cloudflare takes a copy too. When another visitor views my blog, and that same image is requested, Cloudflare will serve their copy of the image, ensuring they don’t trouble my origin for the image (given the cache hasn’t expired). This keeps traffic away from my network/server/house.
If you’re not using nginx, but are using Cloudflare, you can set this up in the Cloudflare dashboard. If your images are all coming from the same url path, e.g. https://ryansouthgate.com/static/images then you can create a Cloudflare Page rule, to cache everything at this location. This will look like the below image in your Cloudflare dashboard:

You only get 3 page rules on the Cloudflare Free Tier, so your mileage may vary depending on the locations of your images and how you have things set up. I prefer to keep as much as my configuration in one place (and in source control - for history), which is why I’ve spent time learning more about nginx, so I can configure most things (including caching) in there. My Cloudflare configuration is pretty basic, its set up to respect to the headers returned from my nginx server, so it reads them and caches resources according to those rules.
Stats
I’ve saved a lot of data/bandwidth by making the switch, and I’m really happy about it. Below is a screenshot of my Cloudflare Dashboard, which shows all the savings!
It’s quite easy to see when I made the move to webp. With a relatively similar number of visitors across the period, the amount of data served dropped significantly after I made the switch in mid-December.
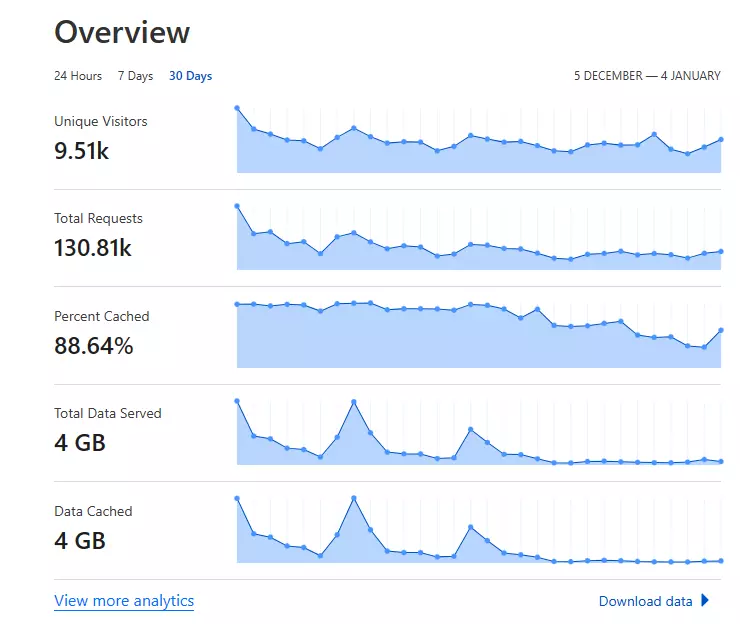
(as an aside, the original screen shot above was a 68kb png, with the command above and no resizing, the webp image above is only 24kb) - savings everywhere!
Conclusion
I hope this has helped explain some of bandwidth savings to be had and how to do it. This is not just beneficial for self-hosters, but to other’s who are might be charged for “data-egress” on their cloud services, or people who just want to be good-stewards of the internet, and a little more “green”.
Thanks for reading!